
It’s taken a long time to get to this point, but I finally have a wall of pink cabinets in the studio! The wall is not completely finished. I still have have a long list of things that still need to be done (which I’ll detail after I show you the painted cabinets). But at least this is a major step towards getting this wall finished!
And this wall being unfinished won’t stop me from admiring the wall of lower pink cabinets because just getting to this point was this was quite the feat. It was a long and drawn out process, from installing the cabinets, sanding the doors and drawer fronts, adding trim, caulking, priming and painting.
Nothing about that was particularly difficult…except this stupid 6-drawer cabinet in the middle…

I put the drawers together, disassembled them, and reassembled them so many times I lost count. I was convinced that IKEA’s instructions regarding the placement of the drawer slides were wrong, so I installed them where I thought they made sense. And they looked pretty good! (The picture above was taken after I went rogue, tossed IKEA’s instructions on the rubbish pile, and did it my own way.)
But I just couldn’t leave it alone. I couldn’t stand the thought that they weren’t put together according to the instructions. So I disassembled them one last time, and painstakingly went through every page of instructions again.
And I finally found my mistake. I had somehow missed that the very bottom drawer front goes on a different way than the other five. Once I made that correction, everything else went together perfectly. 😀 But I assembled and reassembled so many times that I’m pretty sure I now qualify as an expert at assembling IKEA Maximera drawers for the Sektion cabinets. I can assemble a Maximera drawer, drawer front and all, in about two minutes now. 😀
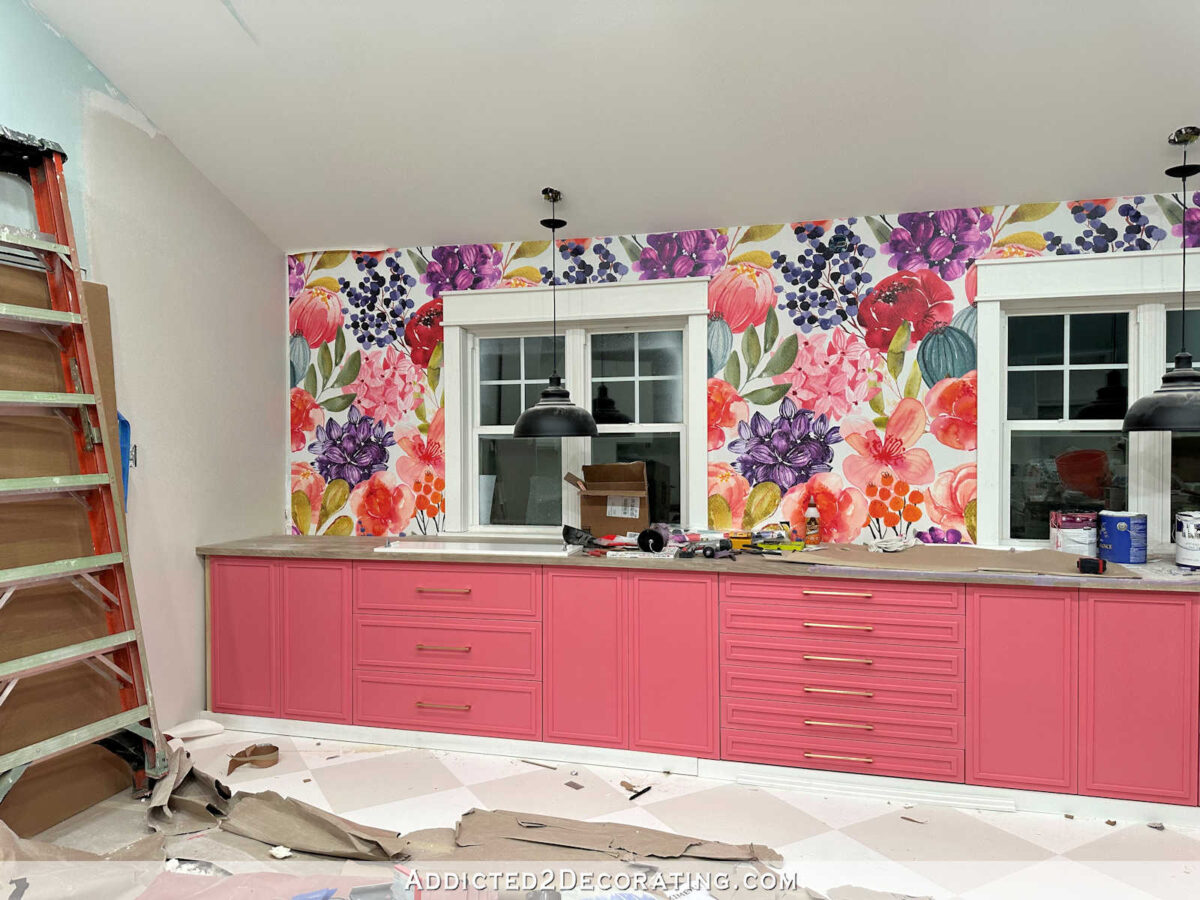
After I figured out that cabinet, everything else went together very easily. Here’s how it looks so far.

Like I said, I still need to finish the trim on the sides and at the floor, and the cabinet doors don’t have door pulls on them yet. But look at this gorgeous color!
I honestly couldn’t be more pleased with how this is turning out. The color is absolutely perfect for me. It’s pink and fresh and feminine without being too bright or too princess pink or too Barbie pink.

The color is from Sherwin Williams (I found it at Lowe’s), and it’s called Tuberose. I had it mixed in Behr Premium Plus paint in an eggshell finish (because I’m always at Home Depot and Behr is my favorite general purpose paint). And then I topcoated it with General Finishes High Performance Topcoat in a flat finish (affiliate link). I know many of you have asked about the painting process, and I’ll share all of those details very soon. For the whole process, I used a roller, a brush, and my little sprayer (affiliate link).

I’m so glad I waited to finish off this wall of cabinets at the bottom because I’ve changed my mind on how I want that to be done. I had originally planned on the countertop on this wall to be a standard desk height (30 inches high) with two desk areas and two desk chairs.

And then I decided to eliminate the desk areas, put cabinets all the way across, and use IKEA Sektion cabinets instead of building my own. That meant that the countertop would be higher than 30 inches.

So without those desk areas, I figured that this 20-foot countertop would be more of a storage surface where I would place things like my sewing machine that I don’t want stowed away in a cabinet. What I didn’t count on is that the new height (about 33 inches) is the perfect height for me to stand and work. I have already gotten so much use out of this countertop! Over the last few days, I’ve used just about every square inch of the 20-foot width of the countertop as a work surface, and it has been absolutely amazing.

So now, instead of adding trim to the bottom and finishing it out like I would do on a built-in bookcase, I want to move those feet back (the 3-inch-high utilitarian feet that I made and added) about 4 inches and have a toekick like kitchen cabinets have so that I can stand comfortably at this countertop to work on projects. I’m going to get so much use out of this area!! And the fact that I used hot glue to attach those feet instead of nails or screws will allow me to make this adjustment very easily even at this late stage.
In all of these pictures, the bottom trim is sitting towards the front (none of that trim is attached yet) in the position I was originally planning. This is how I would trim out the bottom of bookcases without a toekick, but not the bottom of kitchen cabinets that needs a toekick.

So I still have a few items on the checklist that I need to finish before this wall is finished. I kind of want to paint the black pendant lights gold. I like having a little bit of black in the room, but I bought these years ago. Now that I’m finally finishing the room, I’m wanting things to be more light and airy and feminine, and the black seems heavy to me. What do you think? Keep them black? Paint them gold to match the drawer pulls?

I know I’ve said many times, but I’ll say it again. I absolutely LOVE these IKEA Sektion cabinets. The two sections that have three drawer fronts actually have four drawers. There’s a fourth drawer hidden behind that top drawer front.

And all of the drawers come with little plastic pieces that cover those areas on the sides of the drawer boxes that don’t look so pretty right now. That’s where the screws are that you use to do the fine adjustments on the drawer fronts (moving them left and right, or up and down). As soon as all of my adjustments are done, and everything is perfectly spaced, I’ll pop those covers on and it’ll look much more finished.
And I’m absolutely giddy about this middle section with the six shallow drawers. These will be perfect for organizing art pens and pencils, pads of watercolor and yupo paper, sewing items and spools of thread, and so much more.

I feel like I could sit in here and just stare at this wall all day. 😀 And it’s not even finished yet! But that mural and the cabinet color make me so happy.
So what still needs to be done on this wall? There are quite a few things!
- Finish the countertop (i.e., the two missing pieces in the back corners),
- Install the toe kick, paint and clear coat,
- Install the side trim on the cabinets, paint and clear coat,
- Finish the side strips on the mural and finish trimming the mural,
- Install the knobs on the doors,
- Finish wiring the outlets (three to go) inside the cabinets,
- Install the countertop grommet outlets,
- Add the shelves inside the cabinets,
- Wood fill, sand, caulk, prime, and paint the window trim,
- Paint the pendant lights (maybe),
- Clean the windows,
- Install the window shades.
And that’s just one wall. 😀 Then I have three more walls, a back entry, a bathroom, and a storage closet to finish. It’s a really big room! At least I’m to a point where I can actually see some pretty significant progress and I no longer feel like I’m stuck in my own version of the movie Groundhog Day, so I’m feeling more motivated with each passing day.
I’ll leave you with one more look. (And please note that the lights aren’t even installed right now. They’re literally hanging by the wires. I had to undo them to paint the ceiling, but once they’re installed, they’ll be raised at least six inches, as you can see by the placement of the canopy. And the final height will be determined after they’re properly installed, and will be based on my height and where they work best for me.)

Addicted 2 Decorating is where I share my DIY and decorating journey as I remodel and decorate the 1948 fixer upper that my husband, Matt, and I bought in 2013. Matt has M.S. and is unable to do physical work, so I do the majority of the work on the house by myself. You can learn more about me here.